Hamsters are great pets, and one reason is how affordable they are to own. However, they can still cost you a pretty penny up front, especially if you have to buy all the gear at once.
Fortunately, there are a few ways that you can save money, and perhaps the best way to stretch your hamster budget is by creating your own bin cage. These are often made from basic plastic storage bins, but you can class them up a bit—provided that you’re willing to put in the work.
Here, we collected 10 of our favorite designs, and you’re sure to find one that’s perfect for both you and your furry friend. Figuring out how to build a hamster bin cage is simpler than ever with these foolproof plans!
Before we begin, remember that you must include holes of some kind in your bin (that’s what the mesh is for). Otherwise, your hamster could suffocate.

The 10 DIY Hamster Bin Cages
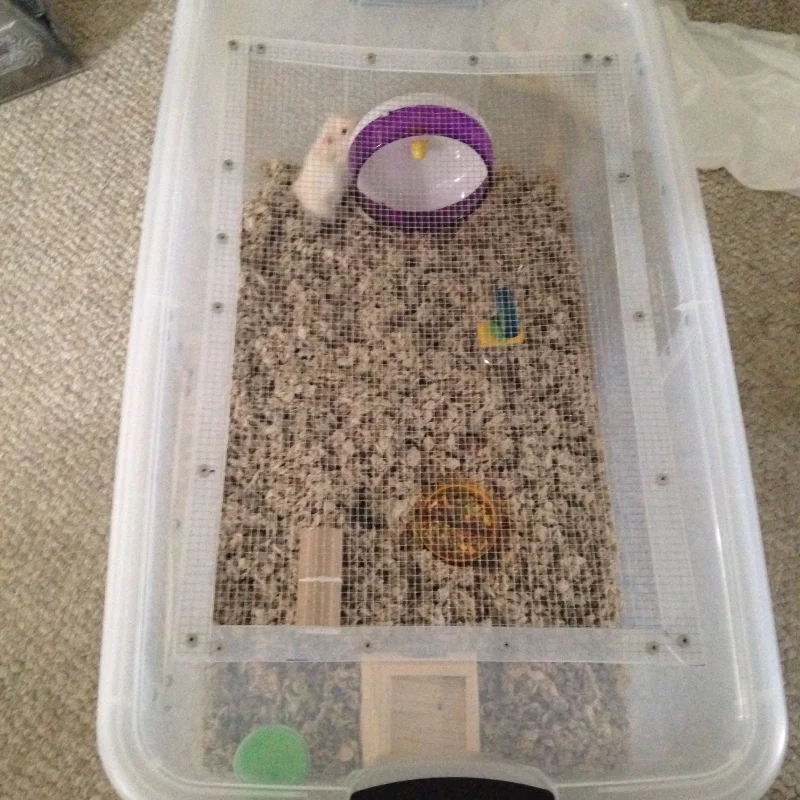
1. DIY Bin Cage by HamsterGuru.com
| Materials: | Large plastic bin, wire mesh, zip ties |
| Tools: | Drill, scissors |
| Difficulty Level: | Easy |
Courtesy of HamsterGuru.com, we have this inexpensive and easy-to-build plastic cage that gives your little rodent plenty of room to play.
All you need is a large plastic bin (you probably have several lying around the house right now), a few other odds and ends, and a bit of time to build your hamster their dream home.
2. Hamster Cage by Nola Claire
| Materials: | Plastic bin, mesh, duct tape, zip ties |
| Tools: | Box cutter |
| Difficulty Level: | Easy |
YouTube hamster guru Nola Claire suggests this clever and colorful option. It uses a lid with locking handles, which makes securing the top easier to do and doesn’t require drilling.
However, it does require you to be extra sure that you close it securely every time.
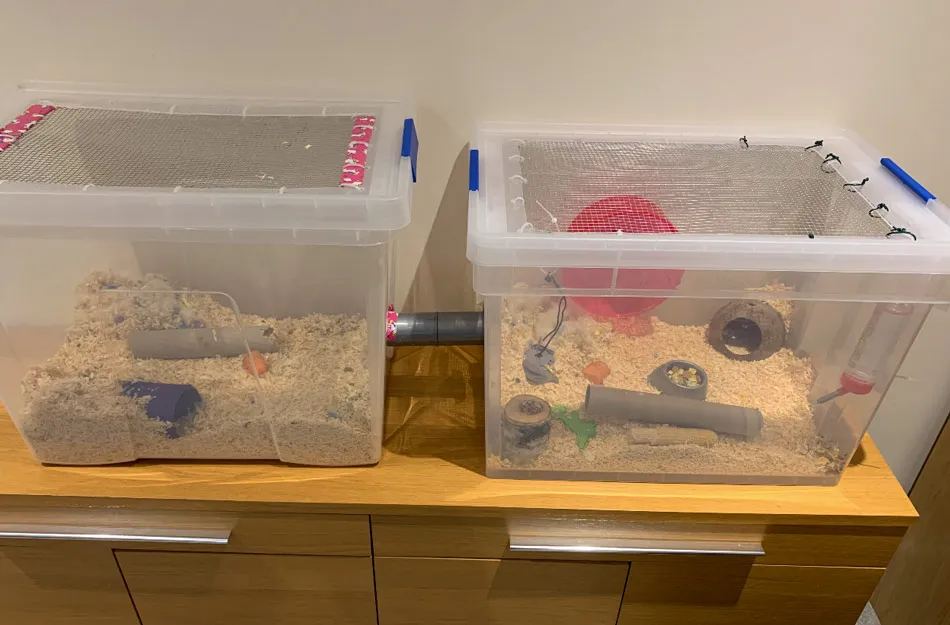
3. Interconnected Bins by HammyHappenings

| Materials: | Multiple plastic bins, mesh, plastic tubing, cable ties, decorations (as desired) |
| Tools: | Box cutter |
| Difficulty Level: | Easy |
This extremely fun, multi-level enclosure is the creation of HammyHappenings, a hamster enthusiast on WordPress. The general structure is basic and easy to build, but there’s a lot of decoration involved with this one, making it a colorful addition to any room of your home.
We’re especially big fans of the tubes connecting the two levels, and we bet your hamster will be too!
4. DIY Three-Story House by Consumer Queen
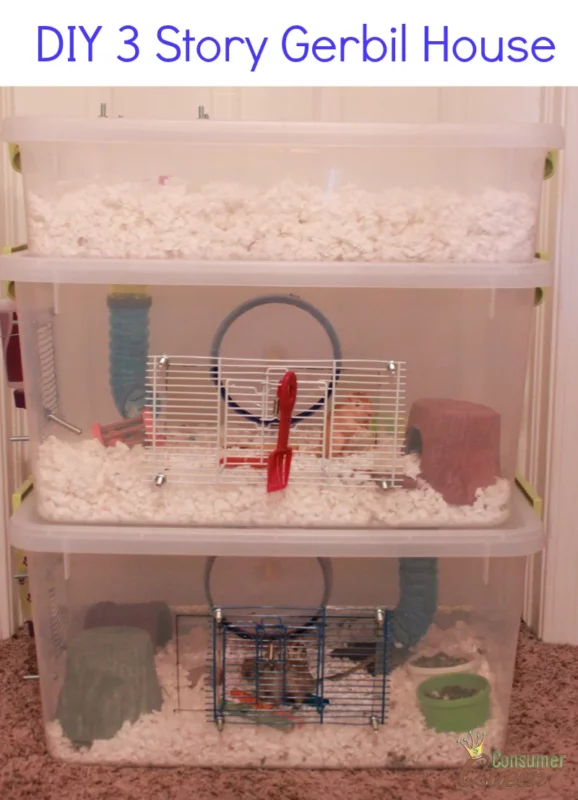
| Materials: | Three plastic bins, mesh, cable ties |
| Tools: | Box cutter, drill |
| Difficulty Level: | Easy |
This triple-story model from Consumer Queen gives your pet plenty of room to explore and provides you with the ability to give every level a specific purpose.
One floor can be dedicated to bedding, another can be the exercise room, and the final one can be the dining room. You probably know which room your hamster will spend the most time in!
5. Double Decker Cage by Hammy Time
| Materials: | Two plastic bins, mesh, screws, washers |
| Tools: | Drill, box cutter |
| Difficulty Level: | Easy |
From Hammy Time, we have this attractive two-story model that gives your hamster plenty of places to peek out—and plenty of opportunities for you to grab them when it’s snuggle time.
This design also gives your furry friend plenty of room to stretch out without also taking up a ton of space in your house.
6. DIY Hamster Only Bin Cage Setup by Planet Fishness
| Materials: | Bin with lid, chicken wire, rope, zip ties |
| Tools: | Knife, Forstner drill |
| Difficulty Level: | Easy |
This DIY hamster bin from Planet Fishness has a simple and straightforward design that you can complete relatively quickly. So, it’s a great plan for beginners who are just starting to explore hamster bin setups. You can use a Forstner drill to insert a hanging water bottle. This DIY plan uses a knife to cut a square out of the lid and insert the chicken wire. The wire is secured by zip ties, and it’s important to make sure to use enough zip ties to prevent hamsters from slipping out.
7. Hamster Bin Cage Tutorial by Instructables

| Materials: | Bin with lid, nuts, bolts, washers, wire mesh, wire |
| Tools: | Wire cutter, drill and drill bits, utility knife or saw |
| Difficulty Level: | Easy |
This hamster bin plan from Instructables provides a safe solution to prevent escapes. It uses nuts, bolts, and washers to secure wire mesh coverings in place. This deters hamsters from slipping out or trying to chew their way out.
The plan also provides additional ventilation by drilling holes near the top of the bin. When adding drill holes, it’s helpful to do it slowly to prevent the plastic from cracking.
8. DIY Bin Cage for Your Hamster by Critter Mamas
| Materials: | Bin with lid, wire mesh, nuts, bolts, washers, zip ties, Velcro |
| Tools: | Wire cutters, drill, box cutter |
| Difficulty Level: | Easy |
Critter Mamas provides simple instructions for creating a substantial bin cage for your hamster. You can either use zip ties or nuts, bolts, and washers to secure the wire mesh on the lid.
A helpful tip that the instructions include is to use a permanent marker to draw in the ventilation holes before using the drill. Once you’ve finished making the cage, you can attach the water bottle to one of the walls by securing it with Velcro.
9. DIY Hamster Bin Cage by Victoria Raechel
| Materials: | Bin and lid, zip ties, mesh wire |
| Tools: | Power drill, Dremel |
| Difficulty Level: | Easy |
While this hamster bin cage from Victoria Raechel uses similar materials as many other DIY hamster bins, it does provide tips for creating a cleaner and more finished appearance. Rather than using a box cutter, the instructions recommend using a Dremel, which provides more control and creates cleaner and straighter lines.
Once you finish cutting out the lid, you can smooth the edges using sandpaper. Then, you can drill holes and secure the wire mesh using zip ties.
10. Hamster Bin Cage by Blue Crystal Sky

| Materials: | Bin and lid, 10-gallon pet tank topper |
| Tools: | Box cutter, hot glue gun, drill |
| Difficulty Level: | Easy |
If you’re looking for a more secure lid, this hamster bin cage from Blue Crystal Sky uses a small pet tank topper. After you cut a hole in the lid, you can use hot glue or an industrial-strength adhesive to secure the tank topper in place.
Another great thing about this project is that it doesn’t require many materials and omits the need for wire mesh, nuts, bolts, washers, and zip ties. If you have trouble cutting through the lid with a box cutter, the instructions recommend using a lighter to heat up the blade slightly.
 Final Thoughts
Most of the hamster bins on this list follow the same basic formula. Take a bin (or build your own, if you want something other than plastic), cut a few holes in it so you can fit the mesh inside, and decorate it to your liking.
While the formula may be basic, it allows for nearly infinite customization. You can stack as many as your ceilings will allow, connect them with tubing, and decorate them to your heart’s desire.
Best of all, even the most elaborate bin won’t cost more than a few bucks. So, if you haven’t already made one for your hamster, what are you waiting for?
You Might Also Enjoy:

Featured Image Credit: Zdeněk Chalupský from Pixabay